

The opportunity for a Harry Potter reference for the title was too tempting…
If you’ve made it here then you probably followed a link from my post about creating your first test framework. If you found it some other way, welcome to The Quality Duck! Those who worked through the guide in the other post, will have used a CSS Selectors and an XPath for identifying elements on a page. In this guide I will help you learn how to find the correct selector for an element, and what “Good” and “Bad” selectors look like.
When writing test code in C# and using IWebElement there are 3 primary ways to identify an element. My order of preference for these are:
– Id
– CSS Selector
– XPath
If every element had a unique Id we would use them but unfortunately, that is rarely the case.
The next best option is to use a CSS Selector. These can be just as good as an Id when you are able to identify the element by a unique class, data or other attribute. Even when we have to construct a path to the element, they can be much more resilient than XPaths.
XPaths are generally the last resort. You can use them, but in my opinion they are not ideal. XPaths are often an explicit path to an element. This means even a small change to the HTML of the site can break them.
How to find the right selector
So, how do you find the right selector? In Chrome, open DevTools by pressing F12. Alternatively right click on the part of the site you want to find the selector for and click inspect.
You will see the HTML for that section of the website. Now its possible you could just read the HTML and work out what you need, but here are some tips to make it easier.
First, click the cursor icon in the top left of the DevTools window. Then click on the specific object you want to find the selector for. This targets the DevTools window to the HTML you are interested in.
If the element has an ID, that would be the first thing to try, as a unique ID is the most robust.
For elements without an Id you could chose a CSS attribute like a class, data attribute etc, but only if it is unique.
If you aren’t sure that the attributes are unique, then you can right click on the HTML and chose to copy a selector automatically:
– For CSS Selector – Click “Copy selector”
– For Xpaths chose between:
> “Copy Xpath” which creates a selector back to the last ID
> “Copy Full Xpath” which creates a selector right back to the HTML tag
These selectors can then be pasted into your code and used exactly as they are.
Examples of Selectors
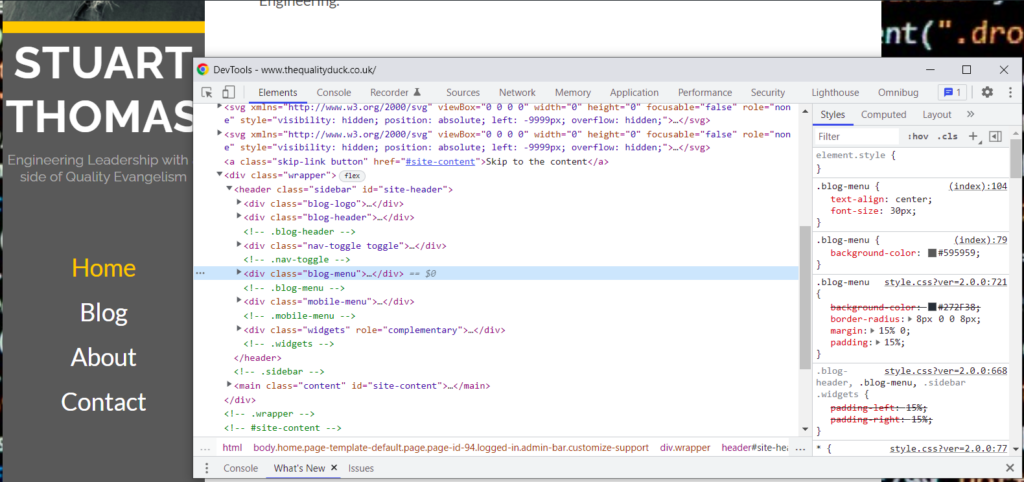
Below are a few examples of a selector along with the corresponding HTML.
menu-item-102 is a unique ID, so our IWebElement selector would look something like this:public IWebElement About => driver.FindElement(By.Id(“
menu-item-102“));However, if we discovered that ID was not unique, and did not exist, what could we try next? We can see that the Classes on the element are not unique, with the exception of menu-item-102 again, but if it is not unique for the ID, lets assume it isn’t for the Class either. Instead, we could try something like:public IWebElement About => driver.FindElement(By.CssSelector(".blog-menu .menu-item-102"));
This selector works by identifying a parent element first, in this case the element with class blog-menu (note we have also used the class variant of menu-item-102 in this case, if we wanted to use the ID it would be #menu-item-102 instead). By having a white space between .blog-menu and .menu-item-102 that tells the code the .menu-item-102 exists somewhere within .blog-menu but may not be a direct child. if it was a direct child (it’s not as the .navigation class comes between them) we could enforce that by placing a > between the two instead like this:
.blog-menu > .menu-item-102
When to use an XPath?
XPaths can be really useful, but, in my opinion should be reserved for only very specific circumstances where CssSelectors just won’t do.
Lets take the above example where we identified the element using CssSelectors and look at what the XPath would look like
/html/body/div[2]/header/div[4]/ul/li[2]
From this we can see it uses the HTML tags to work through the code to our element. There is nothing XPaths like this that could not be replicated using a CssSelector, and so that would be my preferred route, while making sure we keep it as discrete as possible that changes to the front end wouldn’t immediately break our selectors.
I said XPaths have there uses though, and I stand by that. XPaths are fantastic when you need to select an element based on text it contains. There are various ways this can be achieved, the most basic version would look something like this:
//*[text()[contains(.,'Some text we want to find')]]
To break this down
//* – tells it check all element types, we can also do things like //div and //button etc[text()[contains(., – tells it we want to find text that contains the following string'Some text we want to find')]] – the text we want to find goes in-between the ”
Finally, we can also string XPaths together to become even more specific, such as:
//div[contains(@class, 'btn') and text() = 'Send']
Interested in learning more about selectors? Why note read my blog about the Shadow DOM.
Subscribe to The Quality Duck
Did you know you can now subscribe to The Quality Duck? Never miss a post but getting them delivered direct to your mailbox whenever I create a new post. Don’t worry, you won’t get flooded with emails, I post at most once a week.
0 Comments
1 Pingback