

Working on a legacy monolithic software platform, the Shadow DOM hasn’t been much of an issue for me. However, now that we are working on bringing it into the modern world, that is changing. The first of these changes are currently being rolled out to our customers. Up until now, the testing and CI for new micro services and micro front end components have been solely the responsibility of the team building them.
Unfortunately we had an issue with one of these new components recently. This was caused by a change to the underlying monolith, so wasn’t detected by the stand alone testing. Lesson learnt! It is now time to update our end to end testing of the monolith to support the new micro frontend.
This first micro front end is replacing the navigation and, as mentioned, it sits within a Shadow DOM. Our end to end test framework is a C# Selenium SpecFlow setup. I am guessing as you already know as you are here and reading this, there is no out of the box support for using elements located in a Shadow DOM in this type of framework. As you can imagine, that is a bit of a problem when its your main navigation menu!
After some research, I found a number of proposed solutions. Lots of them were using deprecated solutions or plain didn’t work. Eventually I went to the dark side and found a solution I could implement. So to add to the noise in the search results, here is how I added an IWebDriver extension method for the Shadow DOM!
How I fixed our tests to work with the Shadow DOM
First, I created a static class in my “Helpers” folder. If you are wondering what my Helpers folder is then check out my blog post The best C# helper classes all tests deserve
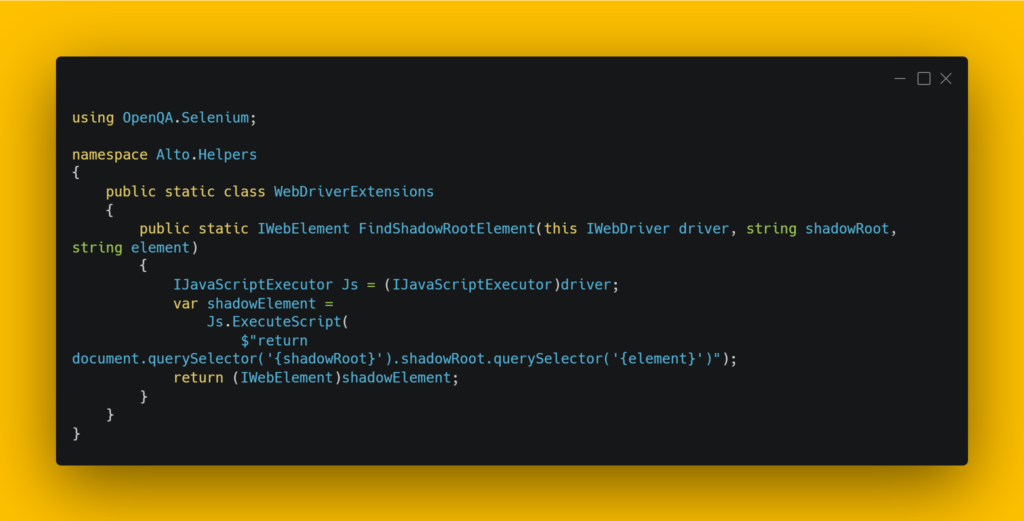
This class takes 2 arguments. The name of the ShadowRoot, and the string value of CSS Selector for the element you want to find within the ShadowDom. The arguments are passed into the JavaScript which does a relative simple call. As this is a post about C# and you may not be familiar with JavaScript, I’ll break it down:
return – much like in C#, this will return the output of what follows.
document.querySelector(‘nameOfShadowRoot’).shadowRoot – This locates the start of the ShadowDom. I’ll show an example of how to find this in DevTools later.
querySelector(‘CssSelectorForElement’) – This then finds the element within the shadowRoot. If this bit of JavaScript doesn’t look familiar, be sure to take a look at my Tips and Tricks blog entry.
Now you understand how the extension method works, lets look at how to use it!
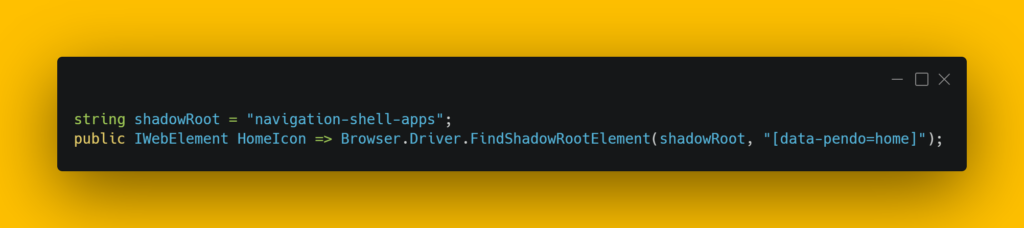
This is an example of one of my Page Objects files. You will see that at the top of the class I declare a string called shadowRoot. This is just so I don’t have to re-type the name of the root each time I need to use it. Instead I can call the string, this makes it far easier to refactor if it changes.
Then on the next line you can see how the whole thing is used. We declare a new IWebElement variable to hold our element. Then call our IWebDriver instance. FindShadowRootElement is now available as an option, much like FindElement would be. Into this we pass in our shadowRoot string followed by the CssSelector for our element. We now have an element in the Shadow DOM that we can interact with.
Something to note. The CssSelector should not contain any quotes, single or double. So where the above example would normally be written as [data-pendo=”home”] it should be written as[data-pendo=home].
More tips and answers to questions about the Shadow DOM
How do we find the name of the ShadowRoot?
When you inspect the page and see #shadow-root (Open) then the element immediately before it contains the name.

So in this example, the shadowRoot name is settings-section
What if #shadow-root has (closed) rather than (open)?
Those elements are inaccessible by design and so cannot be reached.
What if I have a shadowRoot inside another shadowRoot?

This does happen, but isn’t a problem I have had to tackle in our application. It’s simple enough to do should you need to. You would just need to extend my solution to add a second (third, fourth etc) querySelector(‘nameOfShadowRoot’).shadowRoot to the JavaScript. So for the above example if you wanted the header element you would have something like:
return document.querySelector(‘settings-about-page’).shadowRoot.querySelector(‘settings-section’).shadowRoot.querySelector(‘#header’)
or a suitable extension method like I created above. You could even have variations of the extension for each layer of your Shadow DOM.
and lastly…
I was demo’ing this piece of work to a team recently. I explained that I had to write an extension method for IWebDriver in order to interact with elements in the Shadow DOM. The product owner on the team thought I was talking about “something from Marvel”🤣 So just for you Claire, here’s a link to a blog article that explains the Shadow DOM far better than I could have – What the heck is the Shadow DOM?
Want to read more from me? Why not check out my tips and tricks blog
Subscribe to The Quality Duck
Did you know you can now subscribe to The Quality Duck? Never miss a post but getting them delivered direct to your mailbox whenever I create a new post. Don’t worry, you won’t get flooded with emails, I post at most once a week.
0 Comments
2 Pingbacks