

So, you’re interested in starting to write automated tests in C#? Then you are definitely in the right place. In this guide I will take you through a journey towards having a working test framework that is easy to read, develop and maintain, even for those who have never written a line of code in their lives. Talking of which, if that describes you, then firstly congratulations for taking this first step towards test automation, and secondly, I highly recommending investing a bit of time upfront in doing a basic introduction to C# course like this one on LinkedIn learning. It’s not essential, but it will give you a good grounding in the language and ultimately save you time later.
Setting up your project
Download and install Visual Studio (Note this guide was created using Visual Studio 2019), you can use a different version but screenshots may not match.
Start Visual Studio and click on Create a new project
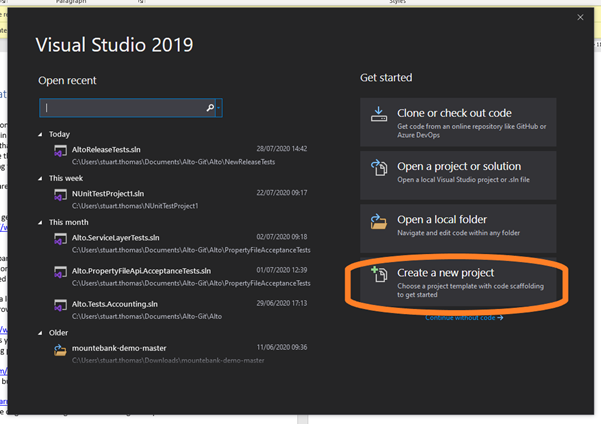
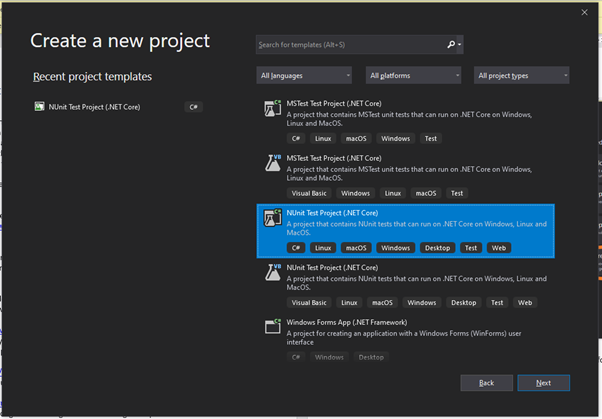
On the next screen, either scroll down to, or search in the text field for NUnit Test Project (.NET core) and click next
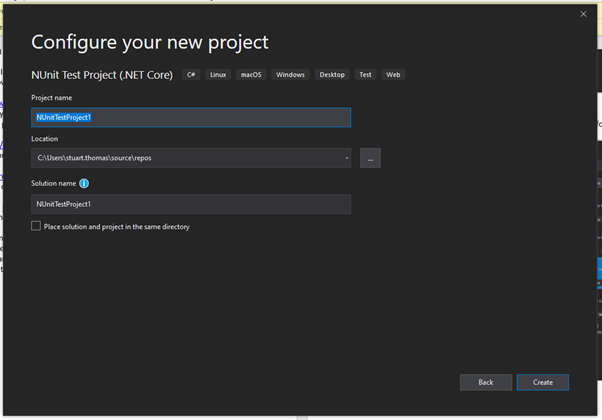
You will then be asked for a name for your project and the solution, for our purposes now the default options are fine. You will need to pick a directory to create your project in though. I recommend making a specific directory for this work. Once you have completed that, click create.
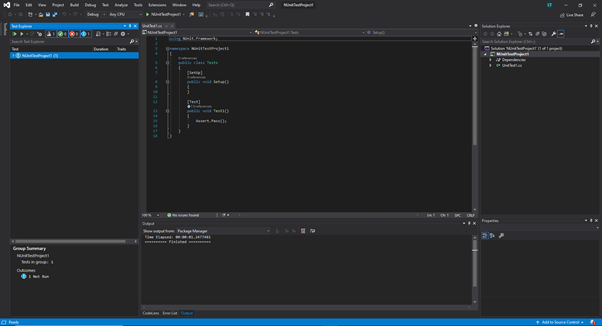
And all being well, you should now have a screen that looks something like this:
Before you go further…
You will need to add a couple of entries to your Path environment variable – If you don’t know how to do this there is a good guide on the java site – https://www.java.com/en/download/help/path.xml
The entries to add are:
path to your project\bin\Debug
path to your project\bin\Debug\netcoreapp3.1
So as an example, mine are
C:\Users\stuart.thomas\documents\NUnitTestProject1\NUnitTestProject1\bin\Debug
C:\Users\stuart.thomas\documents\NUnitTestProject1\NUnitTestProject1\bin\Debug\netcoreapp3.1
Set up your Test Framework using Selenium with C#
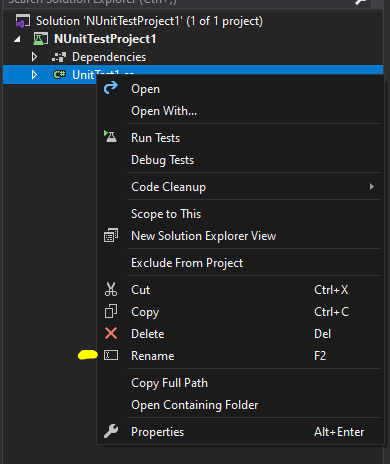
Before we go any further, lets rename the file created by Visual Studio when we created our project to something more meaningful, like FirstTestCase. To do that right click on UnitTest1.cs and click rename
And in the main code window, change the class name from Tests to FirstTestCase also.
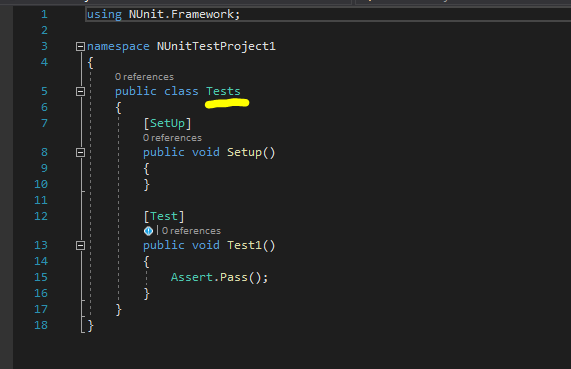
And our screens should look like this

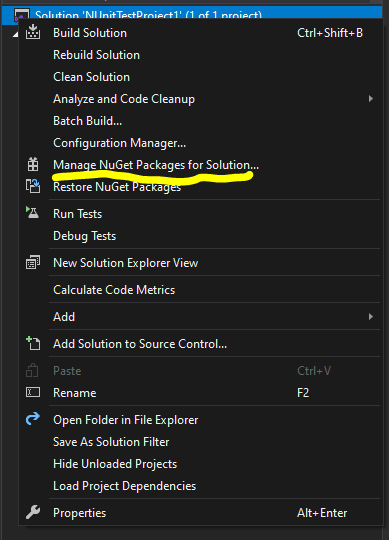
Next we need to add some extensions, called NuGet Packages, to our project. To do this, in the Solution Explorer, right click on the solution (top item in the list) and click Manage NuGet Packages for Solution
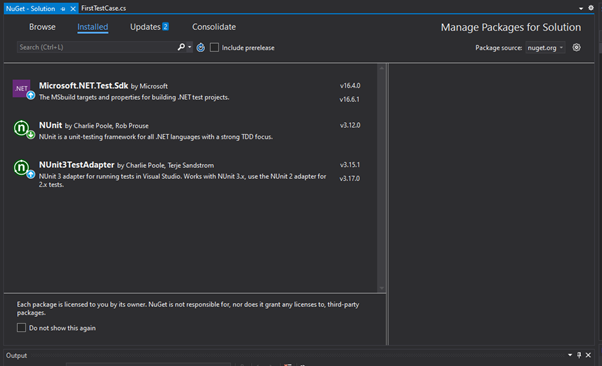
You should then see this screen which is telling you that you already have the listed packages installed (it should be the same or very similar as in the screenshot)
Now go to browse, and ensuring the Package Source dropdown in the top right is set to nuget.org or All, search for Selenium.Webdriver. There will be 2 packages in the results we want to install. First is Selenium.Webdriver, select it in the list, then in the right hand pane tick your NunitTestProject1 entry, and then install and accept any messages that appear.
Repeat the same steps for Selenium.Webdriver.Chrome
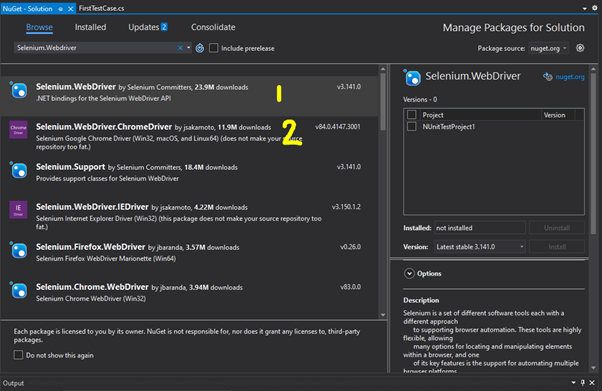
The first package is the Selenium itself, and is required for creating our tests. The second package is a nice little helper, it makes sure that the driver selenium uses for controlling chrome is always available when you build and run your tests.
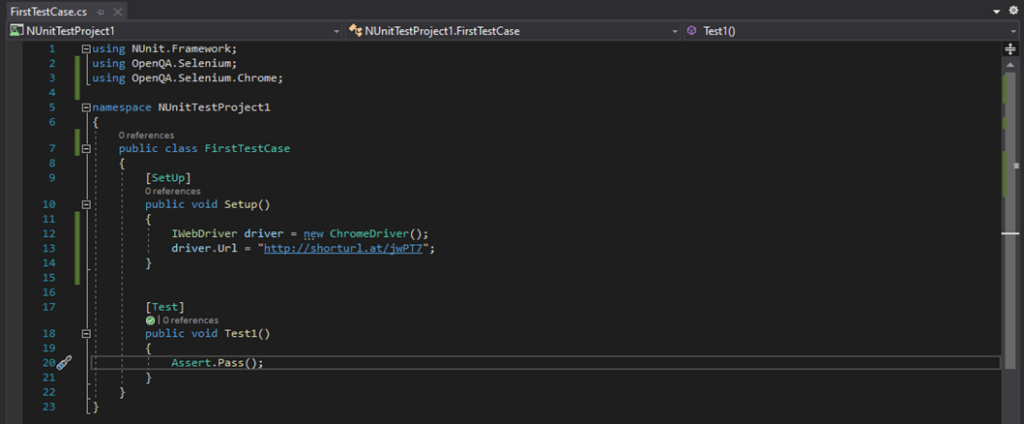
If you haven’t already, you can close the NuGet – Solution window. Before we start writing tests, we want to make sure everything is working as expected, to do that we are going to add some lines of code to our FirstTestCase.cs file. First of all, at the top of the file where you will see it says using NUnit.Framework; add:
using OpenQA.Selenium;
using OpenQA.Selenium.Chrome;
and inside of the curly braces { } below public void Setup() add the following
IWebDriver driver = new ChromeDriver();“;
driver.Url ="http://www.thequalityduck.co.uk/wp-content/uploads/2022/05/great.jpg
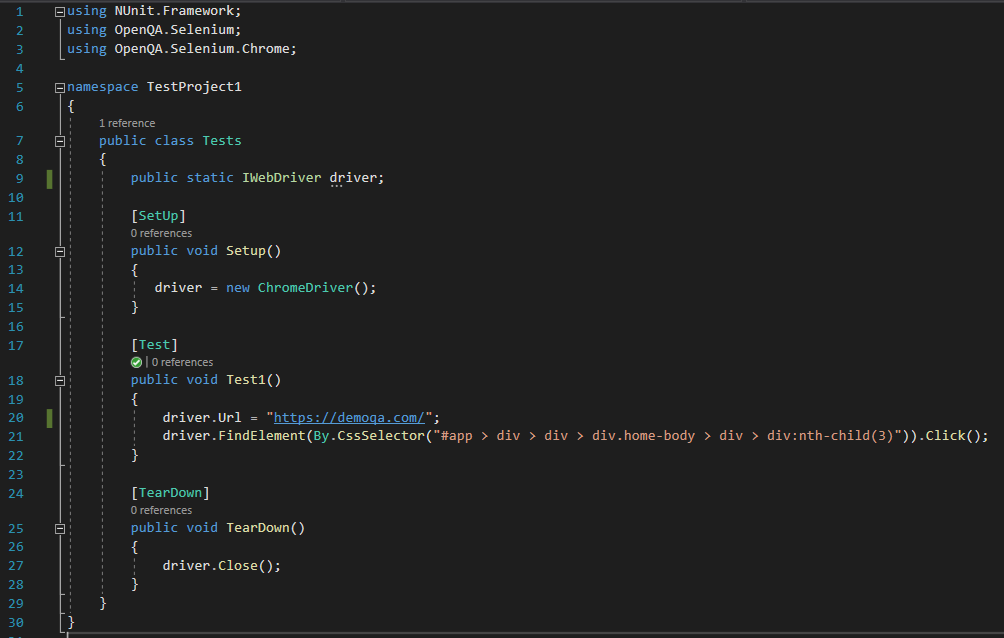
At this stage, we should have some code that looks like this (note, the URL has changed since the screenshot was taken)
But, what does it all do?
The using statements tell the software that we want to make use of selenium and the chrome webdriver. The code we placed into Setup is telling the code to create a new instance of ChromeDriver (load a chrome window), and to name that instance driver (we name it so we can send further commands to it). Once we have done that we tell driver to go to a specific URL.
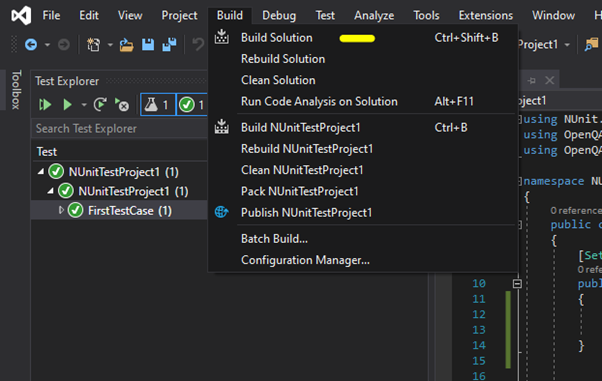
We are now ready to build our code and run it to make sure it all works. First, at the top of visual studio click Build > Build solution, or press Ctrl+Shift+B
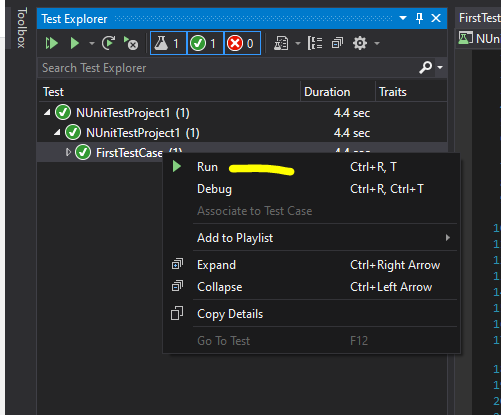
Then in Test Explorer open up each of the drop down arrows until you can see your FirstTestCase, right click it, and click run. If it all works, you should a chrome window open that navigates to a website with a message on it for you…
Lets write a test
Now that we know everything is working, its time to start writing a test, but first, lets refactor our code! If you aren’t sure what that means, there is a lovely wordy explanation on Wikipedia but in short, it means we are going to reorganise our code.
Why would we want to reorganise our code I hear you ask? There can be lots of benefits to refactoring, and in this instance, it is to make it so we can send commands to the chrome instance from more areas of our code. We are also going to take the opportunity to change the URL we are going to to something more useful, and add a new section to our code, the [TearDown] section
Before we test that, lets take a look at the code. We now have 3 sections, [SetUp], [Test], and [TearDown]. Each of these areas of code serve a specific purpose and are run in a set order.
[SetUp] runs first and before every test. This is where we can place details of any and all actions we want to happen before our tests run, at the moment, that is to start the chrome browser.
[Test] your tests will sit in these sections, so you can have one or many.
[TearDown] this runs after each test, and is used to “tidy up” once the test is complete. Currently it is just used to close the browser.
Now that you have refactored your code, run the test again to be sure it still works, that it goes to the new url, and that the driver closes the browser once its done. Did it work? Excellent! Why don’t you try adding a second test to your code? I would suggest just adding a Test2 and copying the first test, but going to a different URL. You can then run both tests the same way you ran the one before and should see both tests complete one after the other. You can also run just one or other of the tests by opening the FirstTestCase section and right clicking and running just the single test you want to run.
Cant see your second test in the test explorer? First try building your code again, but if you still can’t see it, double check your code.
Now we know we can get a website to load, its time to start interacting with it! To do this, we are going use a new driver command “FindElement”. This command allows us to tell the browser to identify an object on the website to interact with. Add the below line of code to your Test1 method
driver.FindElement(By.CssSelector("#app > div > div > div.home-body > div > div:nth-child(3)")).Click();
Before we run it, lets break it down.
driver – that’s the name we gave to our instance of the chrome driver controlling the browser
FindElement – we are telling the driver to locate an element
By.CssSelector – we are telling the driver HOW to locate element, in this case we are using what is known as a CssSelector. There are a lot of different ways to locate an element, each has their own pro’s and con’s. We’ll learn more about selectors later.
#app > div > div > div.home-body > div > div:nth-child(3) – this is the CssSelector, it is a path through the websites code from a known starting point to the element we want. We’ll learn more about constructing CssSelectors later, and why this might not be considered a good one.
Click – This is the action we want the driver to perform once it locates the element.
Ok, now we have an understanding of the code, lets run the test.
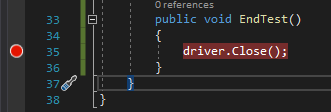
Let me guess, it all happened so quickly you aren’t sure if the test actually clicked the element or not? Well now seems like a good time to talk to you about break points. These are markers that allow your code to pause when it reaches them and can be helpful when debugging your code. For now we are going to add a breakpoint at the driver.Close(); line we added earlier. To do that, click to the left of the line number for that line of code, you should get a red mark next it like this.
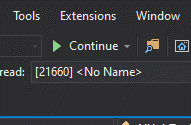
Now when you right click your test to run it, instead of clicking run, click Debug. The test will run and pause before it closes the browser, you can then check the next screen has loaded before clicking Continue at the top of Visual Studio which will allow the test to finish running.
More refactoring?!?!
Yep, sorry! You will refactor your code a lot on your journey and so it is something to learn to love. Refactoring makes your code better, and better code makes everyone happy, right? 😊
This time, it is extra exciting, as we are going to create a whole new file!
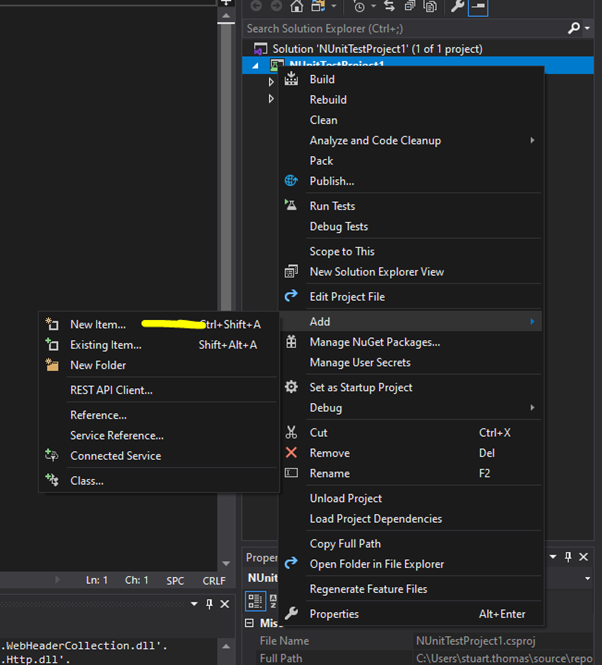
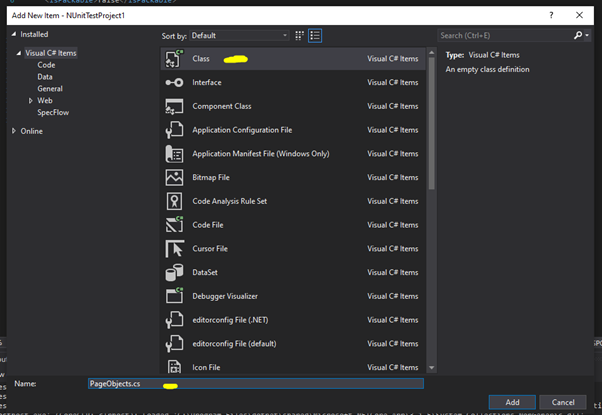
In solution explorer, right click on your project (that’s the one just below the solution) and click Add>New item…
In the screen that appears, select Class and give that class a name of PageObjects.cs
When you create that file, there will be some bits pre-filled, but we can overwrite/replace these as required.
First, we should rename our namespace to from NUnitTestProject1 to PageObjects
We also want to make our class, public, by adding the word public before the word class.
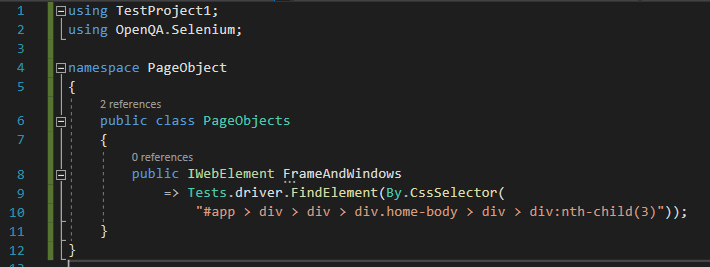
We are now going to move our code that we used for finding the element we want to interact with previously to this new file like this:
public IWebElement AlertsAndWindows => Tests.driver.FindElement(By.CssSelector("#app > div > div > div.home-body > div > div:nth-child(3)"));Lets break that down
public IWebElement – Declares we are creating a new IWebElement object
FrameAndWindows – this is the name we are giving our new object
=> – This identifies that the code to the right is what we will use to define our new object, and that we only initilise it when it is called
Tests.driver.FindElement– This block of code is instruction to use the instance of ChromeDriver we started in the Test class to locate the element in the browser.
(By.CssSelector– this first section is saying we want to find an element by using a CssSelector
(“#app > div > div > div.home-body > div > div:nth-child(3)”)); – Lastly, this is the CssSelector we used before.
With those change done, should end up with something like this (Note, the line breaks are optional and only for ease of reading)
So why have we done this? The purpose is to make our code reusable. It means now everytime we want to interact with that object, we don’t have to repeat the code to locate it, we can “call” the existing code instead. So, lets update our test!
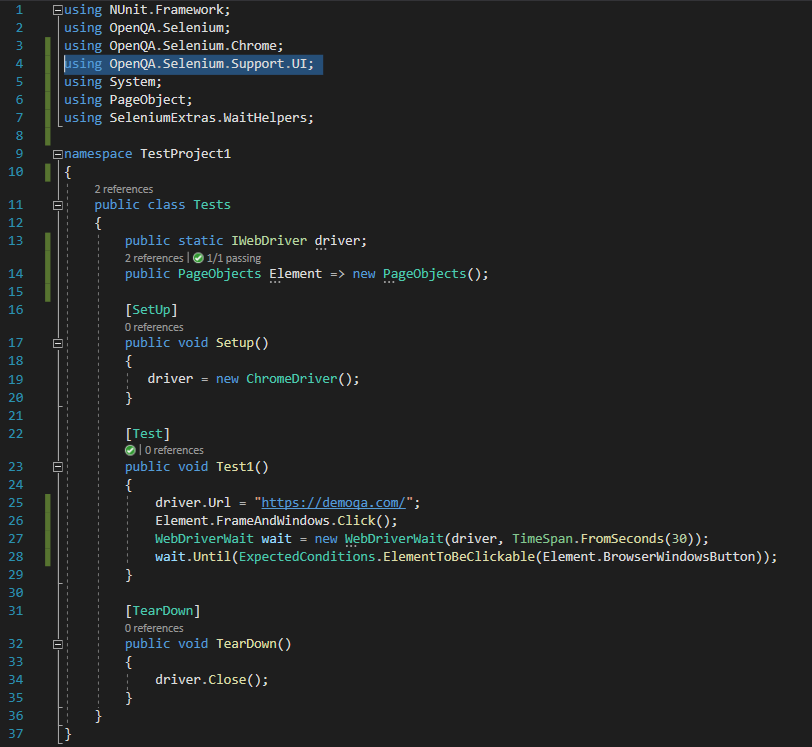
First up, in our FirstTestCase.cs file, we need to add a new using, using PageObjects so that our code knows we want to reference that set of code. Then we want to add the following line of code just below our line containing public static IWebDriver driver;
public PageObject Elements => new PageObject();
This line tells our code that when we type Elements we want to call the code in our PageObject File.
Now we can simplify this line:
driver.FindElement(By.CssSelector("#app > div > div > div.home-body > div > div:nth-child(3)")).Click();
to just
Elements.FramesAndWindows.Click();
-Phew-
That was a lot of changes and we haven’t run the code for ages! Best do that now and make sure it still works. All being well, you got the same results as before, but now we have tidier and reusable code, RESULT!
Lets pad this test out
So at the moment our code navigates to a URL and clicks an element that opens another page. Lets add something that confirms it loads the page it is expecting to.
First up, lets add the element that we want to confirm is present to our PageObjects file
public IWebElement BrowserWindowsButton => Tests.driver.FindElement(By.XPath("/html/body/div/div/div/div[2]/div[1]/div/div/div[3]/div/ul/li[1]"));
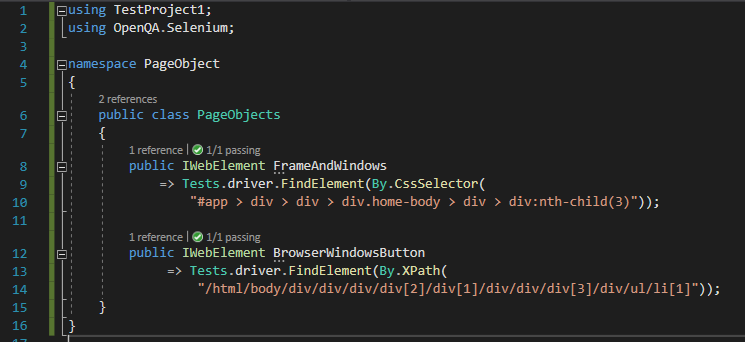
(Note an XPath is just a different way of identifying an element on a page, you can read more on that in my selectors post)
Now we want to add a step to our browser to wait for the element to be present, or in this case, we are going to wait for it to be clickable. To do that we will add the following code to our test
WebDriverWait wait = new WebDriverWait(driver, TimeSpan.FromSeconds(30));
wait.Until(ExpectedConditions.ElementToBeClickable(Objects.BrowserWindowsButton));
But to use that code, we need three new using declarations
using SeleniumExtras.WaitHelpers;
using OpenQA.Selenium.Support.UI;
using System;
and install another NuGet package, SeleniumExtras.WaitHelpers.
Lets breakdown those new lines of code:
WebDriverWait wait => new WebDriverWait(driver, TimeSpan.FromSeconds(30)); – This looks a similar format to code we have already written, and that’s because it it is doing a similar thing. We are telling it we want to use the WebDriverWait function when we type wait and that the driver should wait for up to 30 seconds.
wait.Until(ExpectedConditions – we are then using that new WebDriverWait to wait until a condition is met
.ElementToBeClickable(Objects.BrowserWindowsButton)); – and then we declare the condition we are waiting for is an element to be clickable, and then finally tell it which element it is we want to wait for using the name we have given that element.
Now lets run our test, all being well, we shouldn’t see any different behaviour to before, the new code is just confirming the button is present. To prove that bit of code is working, you could comment out Objects.FrameAndWindows.Click(); (add // at the start of the line) . This time when you run the test it will fail as it cannot find the element. (Don’t forget to remove the // after testing this.)
What about Cucumber/Gherkin?
At this stage, we have a working test that loads a chrome browser, goes to a website, clicks button, and confirms another button is present before closing the browser again. The problem is, its all a bit “codey” and for some, it may still be too difficult to read, especially if you aren’t familiar with the test code and/or website we are testing. That is where Cucumber comes in.
First off, lets add some more nuget packages:
Gherkin
Specflow
Specrun.specflow
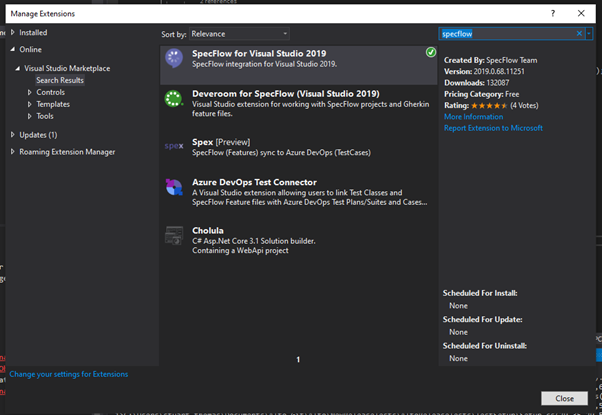
Now we need to add an extension to Visual Studio, Click on Extensions on the tool bar, then Manage Extensions, and install the Specflow extension.
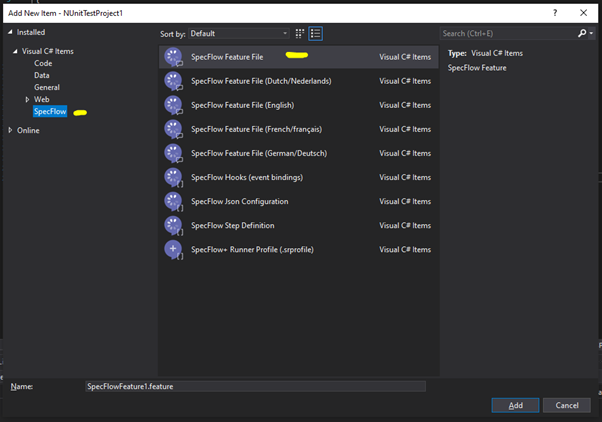
Now we can need to add a new type of file. Right click on the project add>new item…
On the screen that loads, on the left hand side, you should see an option for specflow, select that, then specflow feature file, then add.
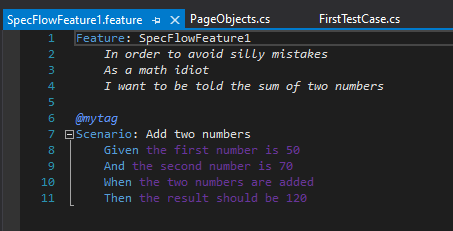
That will create a feature file that looks a little something like this…
Lets break that down.
At the top we have the Feature definition. That is used to give a high-level over view of the feature being tested by the tests within this file, its purpose is documentation.
@mytag is an example of test tagging functionality that allows you to apply tags to tests in order to sort them for running different combinations of tests etc. We will look at those in more detail another time.
Then we have the Scenario, this is our test, or will be, so we will look at this in more detail:
Scenario: – This is the name we will give the test
Given, And, When, Then – We use these in a combination of Given, When, Then, with And being able to be used after any Given, When or Then. For now, we wont use And.
So, lets update our feature file to something more meaningful – you can write whatever you like, mine below is just an example

So, now we have our Gherkin, but how do we link that to our code? Well for that, we need Step Definitions. You may have noticed that your given when then comments are in purple, this is because they are not linked to a step definition. Lets do that now.
Right click on the purple text, select Generate Step Definitions, and then click copy to clipboard
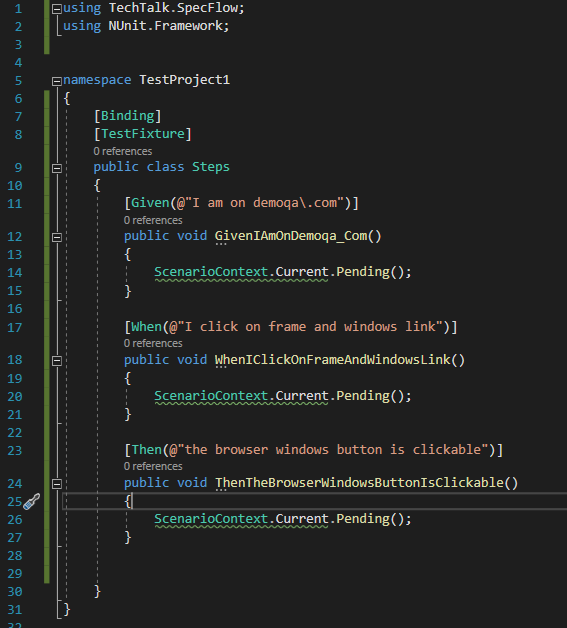
Then add a new Class.cs file – I would name this Steps or Step definitions, or something along those lines, and paste in the content from your clipboard. You will also need to:
- update you using declarations to contain using TechTalk.SpecFlow; and using NUnit.Framework;
- Make the class public
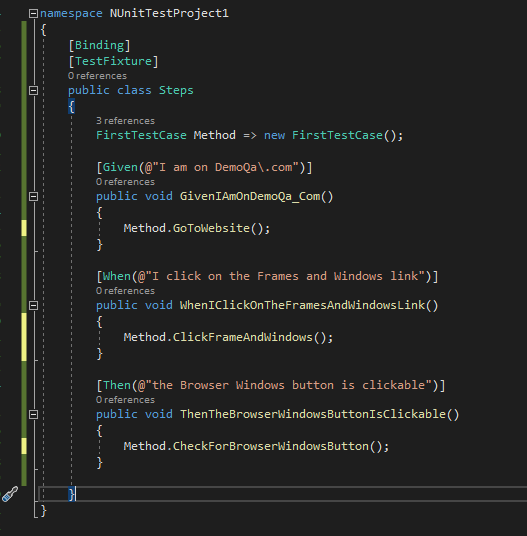
- add [Binding] and [TestFixture] before the class
You should end up with something like this
So we now have our Gherkin linked to some code, but not to our tests. We now need to refactor our FirstTestCase.cs file one more time!
First off, remove the [Tests] tags before our methods, we don’t need them any more. We also need to rename our [SetUp] and [TearDown] to [BeforeScenario] and [AfterScenario] (You may need to add using.TechTalk.Specflow; for those to be recognised).
Now, Test1 contains all three steps for our test, that’s no good, so lets split it out!
We want to take each of those steps and convert each into its own method. I will put my solution on the next screenshot, but give it a go first. Remember, you can call your method whatever you like, it doesn’t have to be the same as I use.
How did you get on? This is how I did it:
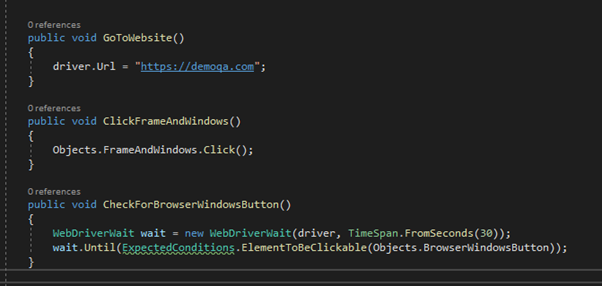
So with our code split into the three methods, we are ready to add these to our step definitions file.
Back on our step definitions file, we need to initialize our FirstStepCase.cs file, just like we did our page objects file earlier.
FirstTestCase Method => new FirstTestCase();
Now we can add each method to the relevant step definition (replacing the ScenarioContext.Current.Pending(); in each step definition with a call to our method). Mine ends up looking like this, if you used different names for your methods, yours will look different
And now, we are ready to run our test again, and, they don’t work?! As per the cover of the best selling book in the galaxy, DON’T PANIC!
In the test output at the bottom of your VisualStudio there will be various output from the tests, and a personalised link to register with SpecFlow, do this and run the tests again and they should now work just fine.
If you do still have a problem with the tests not running it is likely due to not being able to find chromedriver.exe, to fix this find the path to the chromedriver.exe on your machine and add it to the PATH environment variable.
Your test should then run successfully and you have now created a test framework with a working test!
A final refactor of the Test Framework – Helper methods
We have some great code, but we can make it better! Remember that code we wrote to wait for an element to be clickable? Wouldn’t be great if we could re-use that code when we want to do similar things in the future, rather than retyping that whole thing out each time? Well we can!
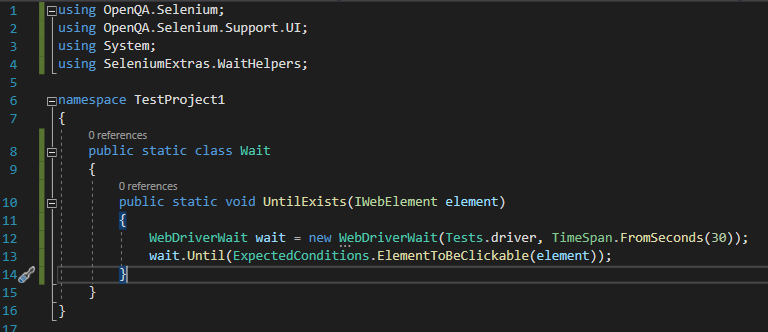
First of all, lets add a new class to our project, I’m going to call it the Wait class.
For this class we need the following using declarations:
using OpenQA.Selenium;
using OpenQA.Selenium.Support.UI;
using System;
using SeleniumExtras.WaitHelpers;
Now we are ready to create our helper method.
public void UntilExists(IWebElement element)
{
    WebDriverWait wait = new WebDriverWait(Tests.driver, TimeSpan.FromSeconds(30));
    wait.Until(ExpectedConditions.ElementToBeClickable(element));
}
As always, lets break down that code:
public void UntilExists(IWebElement element) – we are making a public method called UntilExists that receives an IWebElement object as a variable that we are naming element
The next section
WebDriverWait wait = new WebDriverWait(driver, TimeSpan.FromSeconds(30));
wait.Until(ExpectedConditions.ElementToBeClickable(element));
is almost identical to the code we used earlier, except we now put element in the final brackets as this is the variable we are passing to the method.
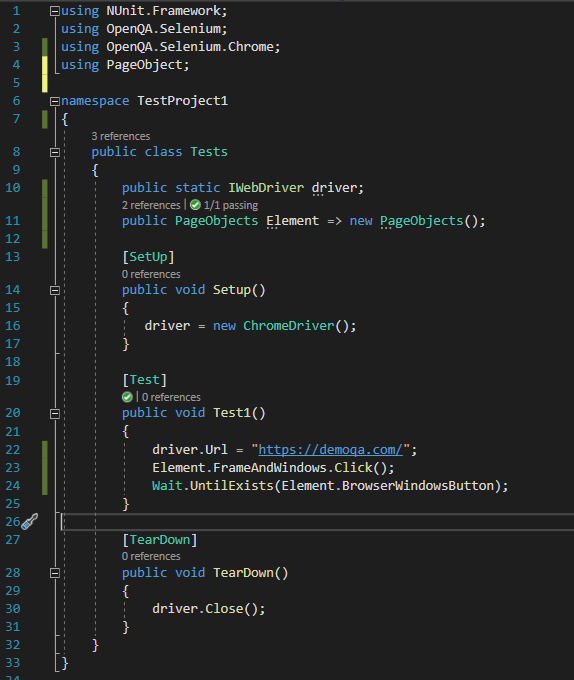
We are now ready to update the code in FirstTestCase.cs by replacing
WebDriverWait wait = new WebDriverWait(driver, TimeSpan.FromSeconds(30)); wait.Until(ExpectedConditions.ElementToBeClickable(Element.BrowserWindowsButton));
With
Wait.UntilExists(Element.BrowserWindowsButton);
Lets run the test again to confirm it still works.
There is a LOT more refactoring you could do, and they are things you will almost certainly look at in the future, but for now, you are ready to start experimenting in the framework you have created. To learn more, I would suggest reading my Tips and Tricks and Fantastic Selectors and where to find them blog posts.
Subscribe to The Quality Duck
Did you know you can now subscribe to The Quality Duck? Never miss a post but getting them delivered direct to your mailbox whenever I create a new post. Don’t worry, you won’t get flooded with emails, I post at most once a week.
0 Comments
3 Pingbacks